Saturday, April 19, 2008

Slowly But Surely

I've finally got the body done and cut a couple of the steeks so I could try it on. I did a three needle bind off at the shoulders. That was my first time, I really like the method. Although I did one half with a ridge, and then tore it out and did the opposite. I've got a few things to deal with, like on button hole that is a stitch off from the others.


I'm fairly happy. It's the right short length, but I'm not sure about the shoulders. It's just so bulky to be a drop-shoulder (it's turned under in this photo). I'm trying figure out if I can cut a bit out of the sleeve holes and make the sleeves correspondingly larger at the top to fit. Right now the upper sleeve circumference is about 19", so another inch would be good.

I did my measurements on a thin cotton Norwegian sweater of mine. I didn't take into account the very different drape this one would have, so I'm having to change some things.

Meanwhile, I started on the first sleeve, which I will hold on until I decide about the upper sleeve.


Taking stock, I have so much left to do. Make the sleeves; bind all the opening edges with fabric on the inside and trim on the outside; reinforce the buttonholes after the fabric goes on the back; cut open and put trim on cuffs; put on buttons; sew on the sleeves.

Saturday, April 12, 2008

Plugging Away

Hi, All. Not much more progress, but enough to post and let you know I'm still at it.


This is the back. I'm about 7 inches into the armhole. 5 more inches to go.


I'm pretty happy with it. The pattern is starting to really come out now. I've got 15 more rows to finish this particular motif and the I THINK I will do another row of trees. Not positive, yet. I really like this "off the cuff" knitting. You just never know where it will end up.

Hope the rest of you are still progressing. Take care. Tracy J

Tuesday, March 18, 2008

Sweater finished...sort of

Tuesday Morning
The sweater looks finished, but the sleeves are too long!!!! I'm wearing it to work today, but tomorrow will see it back on the needles. It's worth it to get it right.

Wednesday
It took all day, but the sleeve surgery is successful. The whole story is on my blog.

Thursday
Finished and wearable. Of course, the dog had to get into the picture.

Sunday, March 16, 2008

Neck and front bands

I have finished the "Cut and Sew" neckline and front bands. I have a step by step narrative on my blog. Pictures of the finished sweater will follow after its bath.

Friday, March 14, 2008

My sweater's almost finished

I am working the buttonhole band on my sweater. The neckband is done. Pictures on my blog when I get time. maybe Sunday. I'll let you know. I took pictures of the whole cut and sew process. I also finished the button band.

I understand being tired of lice Tracy. I had less trouble on the second sleeve. Perhaps it's like coming home from a trip. The distance is the same, but it seems shorter.

Thursday, March 13, 2008

Getting There....

Hi, All.

I've just finished the underarm gussets and I'm starting on the chest.

I am pretty sick of lice. Can't wait for the sleeves :p

Here's the patterns that I have put together for the chest and shoulder area.

This will fill the 70 rows and then I will have 2 inches to play with at the top. Not sure what I will do there. I'm just making this thing up as I go along. It's fun.

So, how are the rest of you doing?

Take care....Tracy J

Saturday, March 8, 2008

armhole steeks

I thought L'Tanya's question was important enough for everyone to hear about, so I'm making a main post instead of answering in the comments.

L'Tanya, you are right. In the scenario you describe, you will lose body stitches. That shaping is for a modified drop shoulder, or what I like to call a square armhole. You don't lose any fit, though, because you add that back into the top of the sleeves, making the sleeves a couple of inches longer. In this scenario, the shoulders fall higher and closer to your actual shoulder line than in a true drop shoulder, and you have a slightly snugger fit in the shoulders, but by no-means constricting. This is actually the shaping that I used on the Andean sweater in Ethnic Knitting Discovery. It's perfectly acceptable to use this in a Norwegian sweater, but it's not traditional. You just want to align your pattern stitches so they center nicely around the armhole steeks and look balanced after you cut.

Here's the schematic of an Andean sweater, showing the armhole shaping.


If you want a true drop shoulder, where you keep the same number of stitches all the way to the shoulder seams, you don't need to do anything for a steek, or you can BO1 stitch and CO5-7 if you want to have the extra fabric to cut and fold back as a facing. In the Norwegian sweaters in Ethnic Knitting Discovery, I went with the old-fashioned technique of doing nothing in advance. You just knit a straight tube all the way up to the shoulders, then you make slits where you want the armholes. In this scenario, the shoulders drop down and sit on the upper arm, and you make the sleeves shorter to compensate.

Here's the schematic of a Norwedigan sweater, showing the lack of armhole shaping.


The total sleeve length, from center back neck to wrist, has to remain the same for both situations, so you add the part you remove from the armhole to the top of the sleeve to compensate. See how the top of the sleeve fills in the cut out body area on that first drawing? In both of these styles, I make the armhole depth the same. For a 40 or 44 inch sweater that I make for myself, I like a 10 inch deep armhole, so it's nice and loose. Probably going down to 9 would still be OK without causing the sweater to pinch at the underarm. But for me, that makes the sweater feel a little too snug, especially if I'm wearing it over a heavy winter turtleneck.

Does all that make sense?

How's everyone else doing on their knitting? Pictures, pictures, I want to see more pictures! :-)

Friday, March 7, 2008

Steek Question

I'm trying to figure out what patterns would work well on the yoke of my sweater. I realized that if I BO say 7 sts for each armhole, then CO 7, those 14 sts will then be my steek stitches. So I'll "lose" those stitches. In my case, my 204 sts will turn into 190 sts. Right?

Does it matter that those stitches are "lost" (in terms of fit)? Or should I CO 28 sts to make up for the 14 steek sts?

Sunday, March 2, 2008

Steek Tutorial is finished.

I have sewn in the first sleeve, and worked up a tutorial explaining how I did it.

It is on my blog.

Saturday, March 1, 2008

Coming tomorrow

I'm working on a steek tutorial. I'll publish it tomorrow. I can publish this on my blog and link to it here. I finished one sleeve and used that to measure armhole depth. I'll also do a "Cut and Sew" neckline tutorial. I'm still thinking about how I want to finish the neckline.

Friday, February 29, 2008

Swatch

I finally have a swatch to show. As you can see, my gauge in the lower portion is different from the upper. I'm making this sweater for my 3-yo son and used the weaving method to prevent longer floats (floats and wild 3-yos don't go together). I wonder whether or not that makes the difference in gauge or if it would be that way regardless. In either case, I suppose I'll just go up in needle size when I get to the motif. And I'll probably do a zig-zag pattern along the bottom. Anyway, I love my colors (except the brown) and the yarn I'm using, which is JaggerSpun Maine Line fingering.

I also played around with a crocheted steek. This was my first time steeking so I've got a few questions:
  1. What steeking method are you all using? Does it matter in this case?
  2. When I get to the point where I do my checkerboard border stitches (is that what they're called?), do I bind off a certain number of stitches and then start them?
  3. Do I do the sleeves first, measure and then determine the length of the steek? Or is there some way to calculate how long the steeked section should be ahead of time?


Wednesday, February 27, 2008

The attack of the gauge grinch

My sweater sleeve grows slowly. Many of you know the feeling. Knit, knit, knit, measure. No change! Knit, knit, knit. measure again. I have done all the increases that I calculated. The sleeve is still too narrow and shorter than expected. Check the gauge on the sweater body in the lice section. I wish I had measured the gauge on the swatch before its bath. I think it relaxed. Refigure using the new figures. I've almost finished the "extra" increases and the sleeve width looks good. I'm at 16" long and close to the 20" circumference that I aimed for. Lice will continue until 19" and then the zigzag pattern like the yoke peerie. The sleeve will be worked straight after I finish the increases. I'll count the rows of lice to make the other sleeve match.

No Knitting, But a Sketch

Okay, I've decided to start working back and forth from the underarms up. I'm just waiting to be in the right frame of mind to check my gauge and perhaps do a bit of decreasing for the upper body, and figure out what that means for the sleeves.

In the meantime, here's a rough sketch of my sweater. The red in the drawing represents the trim and the red hatching that only shows at centerback is the fabric facing.


The two bits of trim are samples from Norway. I'm leaning toward the one on the right with a bit of green in it, although I like the handwoven look and feel of the other. I found a source for buttons here in the U.S.

Monday, February 25, 2008

Crossroads

Here is a photo of how far along I am - almost to the armpits. I have no idea why I did the steek all in white, I planned stripes.


This gives a better idea of how it will look. The buttonholes will be bound in red, and hopefully the edge will lay down when blocked.


Now I have to decide how to proceed. I originally was planning on doing the whole thing in the round, with steeks at the armholes, and cutting out the neckline. But the Fana book says to work the front and back separately from the underarms. This makes sense because the neck isn't a "V", it is actually a very large "U", which I like, but I would end up cutting out a lot of knitting. However, it will mean purling, which I try to avoid (and not sure if my knitting will "match"). It will give a nice bound off edge to graft the sleeves onto, though.

Also, I wanted to do some shaping because the sweater that fits me well is 46" at the bottom, and 42" at the chest. I have to figure out how that will affect my sleeves. I've been studying Ethnic Knitting Discovery, Knitting in the Old Way, and Fanatroyer to decide my next steps.

I guess I can start a sleeve while I think about all this. The cuffs are worked flat because there is a slit and button effect, not sure why one wouldn't just steek, though. At least that will be some practice on working the shoulder star motif flat.

Sleeve progress

The body of the sweater is ready for steeking. I just need to finish a sleeve to know how long to make the sleeve steek. The sleeve is about 10" now, but each row gets longer for a while. The finished sleeve will be about 20 1/2" long. A long way to go, and lice pattern is not as interesting as the other patterns. The upside is that 3/4 of the rows are just knit in one color. This is working well for the sleeve increases. I'm increasing every 4 rows and the lice pattern is an 8 row pattern. I am putting the increases in the row before the lice. It's a lot easier than increasing in the pattern at the wrist. When the sleeve reaches the target width, I'll work straight up to the shoulder seam.

What is all that stuff on the top of the sleeve? The sleeve is too big around for the dp needles, so I added a circular. There are 3 dps and one circular on the sleeve right now. I really need a 2nd circular, which is on order from KnitPicks. The side marker is where I started on Sunday morning. It helps to know how much progress I've made. It is on a circular earring finding. The other marker is at the start of the increases and makes it easy for me to count how many I've done.

Thursday, February 21, 2008

The light is even closer


I know the light at the end of the tunnel is not a train!!I have 5 rows to go on the body and 3 of them are knit plain. What you don't see here is more zigzag pattern. I had to rip out 3 rows because I wanted it to mirror what is below the yoke. Next up is sleeves. After I knit one sleeve, I'll probably sew the steeks. At that time, I'll know exactly how wide the sleeve top is. I'm doing a round neck, as I don't look good in boat necks and this is a cardigan. The top of the sweater looks like it pulls in, but it is still on the needles. My shoulders are narrower than my hips anyway. I have a better picture of the yoke pattern, but don't look too closely at the zigzags. They are mirrored now.

Wednesday, February 13, 2008

Moving ahead. Finally!

Hi, All. I finally am moving forwards instead of backwards. Sheesh. I got my gauge with the headband and worked out the math quite easily. Then I start knitting totally wonky...either too loose or too tight. ARGH! I had to tear it out 5 times. That's bad when you are a wide body using not so heavy yarn. The yarn was beginning to look pretty frazzled. Anyway, I've got my gauge correct and am finishing up the bottom pattern. Then I'll start the lice. I think I will be putting in gussets at the under arm. I have no idea what I'll be doing for the chest patterning. I'm just winging it. I've got 10 inches or so before I have to decide.

No way will I be ready to steek at the end of the month. I'll just hide and watch while I'm slowly knitting away.


Body Progress - near the end


I can see the light at the end of the tunnel. I finally got the yoke pattern centered (It took 3 tries, requiring frogging 10 rows each time). I have the peerie pattern lined up with the other pattern so that the diamond ponts match with the zigzags. I'm using a 30 row pattern which I will repeat once and then add the peerie pattern again. The body measures 16".

Saturday, February 9, 2008

A bit done

Okay, so far my work is looking a little wonky. I've started the lice there at the top but you can't see it very well in this picture.
There are several issues going on:
1. I decided to have my large motif on the bottom and I'm still not sure what I'm doing on the top.
2. The hem facing is out of a yarn with a slightly different gauge and I'll have to re-do that later.
3. Clearly, I need of lot of blocking, but I think it should even things out.
4. I have 16" knitted and have 14" more to go so we'll just see....

Sunday, February 3, 2008

Starting our sweaters

It looks like at least one person has gotten started on their sweater. I'd love to see more pictures of the swatches, too! A lot of you who have signed up for the blog haven't poste yet, so get those photos uploaded to inspire the rest of us!

If you followed the last post I wrote and made your headband swatch, you'll have a pretty good idea about how I organized the projects:

Get Ready -- Select your yarn and needles. If you made the swatches already, then you've already gotten this part completed.

Get Set -- Gauge and sizing. You should have your gauge figured out, and you'll use the sweater schematic and/or the worksheet in the book to figure out the nubers you need to get started. If you have any questions about this important part of the process, feel free to post them in comments here or on the EthnicKnits Yahoo! Group.

Knit! -- That's what we've all been waiting for, right? Using the sweater schematic (for those who already are familiar with sweater design and who like to wing it), the worksheet (for those who like to figure out all the numbers in advance, or the step-by-step instructions (for those who like extra notes that help with the details and keeping your place), forge forward with excitement and bravery!

Here's a tip about row gauge from page 125:
Although row gauge is not critical in this sweater, knowing the total height of all your chosen pattern stitches lets you check to be sure they will fit within the length of the sweater body. In addition, if your rows are very tall or
very short, the pattern stitches may look distorted. You can troubleshoot this by knitting the swatches. If you prefer, you can choose your pattern stitches as you go along and wing it, in which case you may not be able to complete the chart for the pattern at the shoulders. If it looks like you won’t have enough room for a larger pattern in the allotted space, work the small diamonds or stripes here. If you are going to wing it, I trust that you can make the necessary adjustments!


But don't be afraid to ask if you need help!


Note that there are 2 different Norwegian Sweaters in the book. The bodies and sleeves are pretty much the same on both -- there is little shaping and no special preparations are made for cutting the armholes and necks. However, there are a couple of differences that you'll need to take note of when you get ready to finish the body.

One sweater has a boat neck with a facing, the other has a cut out crew neck with a neckband. If you make the boat neck, you can make a separate cowl and stitch it into the neck as a turtleneck if you desire. I got this idea from a 1970s Dale of Norway book. I like the flexibility of this design, because you can remove the neck and wear the sweater in warmer weather or where the winters are less severe, and reattach it for a weekend of skiing of a winter in the mountains.

From the book on page 113:
The sweater on the right has been designed in worsted-weight yarn with 5 stitches and 6 rows to the inch (20 stitches and 24 rows to 10 cm). The sweater on the left (and opposite) is in chunky-weight yarn with 3 stitches and 4 rows to the inch (12 stitches and 16 rows to 10 cm). Both sweaters have a 40-inch (101.6-cm) body circumference and 24-inch (61-cm) body length (including 2 inches [5 cm] of ribbing). There are extra plain rows between the design bands to put the patterns where the knitter wants them.


You don't need to worry about that now, but when you get closer to the top of the sweater, you'll want to consider where your upper body motifs will fall and, if you'll be cutting out a crew neck, think about how far into the motifs the neck outline will cut. More on that later, just keep it in mind for now. It should take a little while to get that far!

From the book on page 123:
The illustrations above and opposite show a sweater with a 40-inch (101.6-cm) body circumference and 24-inch (61-cm) body length (including 2 inches [5 cm] of ribbing) in chunky-weight yarn with 3 stitches and 4 rows to the inch (12 stitches and 16 rows to 10 cm).


Illustrations by Illustrations by Joyce M. Turley, www.dixoncovedesign.com

Knitting Along


I did my swatch in December, washed it, blocked it, let it dry, and ignored it. I started my sweater on January 23, with a slightly different border pattern from my swatch. I'm using vintage fingering yarn from Candide, acquired in a guild swap. My main contrast color was the only thing available locally that looked good. I guess that if I want to knit multi-colored fairisle, I'll have to hit the internet. There's very little wool fingering yarn in this town. The peerie (small) pattern is the same yarn as the MC, left from another project. I do like the muted colors. The first picture show 3 1/2" of work with a picot hem. Needle sizes 2mm for the inside of the hem and 2.5 mm for everything else.

I'm making a cardigan and will steek the front, as well as the armholes. As of this morning, I'm just short of 9" on the body. I need at least 14", probably more before I start the yoke pattern. You can see my 6 st steek in this photo. Total stitch count at this point 351 sts.

Thursday, January 31, 2008

Fana Headband

My headband has been knit for a while now, I wanted to finish it before I posted, but I can't decide if I want to line it or?? I think I'll wait until I get my trim so I'll have a trial run sewing it on before I finish the sweater.


Sorry this photo is so bizarre, I didn't make a non-rolling edge because I knew I was going to be sewing the edges under, so I had to pin it to a hat.

The good news is my tension was fairly good, no puckering or huge loose floats. So now I have my gauge and the dimensions of a sweater whose fit I like. Time to get to a little figurin' so I can order the rest of my yarn.

In other news, I contacted Annemor Sundbø to get permission to post a photo of a Fana sweater from her book "Everyday Knitting: Treasures From a Ragpile". (It will be on my blog, but right now I am being tortured by Blogger, who hates me and my mac, and makes posting photos an often impossible endeavor.) I found out that she had a few copies left of a book about Fana sweaters that I had been trying to find in the U.S., which I ordered, and she is helping me with the trim.

Edited to add: here is the post with the photo

Tuesday, January 29, 2008

Buckling down to the task

I completed a couple of test knits Friday night so I was able to return to the KAL. Before applying needles to yarn I needed to make sure I had my pattern ready to go. I double checked my measurements, calculated my sections, plotted my final charts and took a deep breath.

Provisionally cast on 406.

I'm a big gal and pear shaped. Twelve inches is the difference between my bust and hips. If I did a straight line box knit I would either have a sweater that fits fine around the bust and stretches over my tuchus like a sausage skin, or a nicely draping hemline with bunches of fabric to swim in at my shoulders. The wedge in the sides that will turn the the box into an A line shape. With my gauge at 7 stitches to the inch, it meant that I had 84 stitches more to start with than what will end at the underarm. Mama.

Tuesday, January 22, 2008

Not my swatch

If I was going to make my sweater in a worsted-weight yarn then this could be my swatch. My kids were most impressed with the book and the stitch patterns and asked me to knit them something. My son was particularly taken with the llama, so a llama hat it is! I'm still working on my daughter's (she wanted snowflakes).


The blue, green and white yarn is Knitpicks' Wool of the Andes, the gold is Elann's Peruvian Highland Wool. Colours and design chosen by my son Aran.

I'm quite happy with how the hat turned out and I might make Aran a llama sweater (once my sweater is done!), so this may end up being a swatch after all.

Monday, January 21, 2008

No headband but graphs galore

Hey ho, gang!


I haven't had the time lately to work on the headband and probably won't until later. I did do some preliminary swatching to check to see if my gauge had changed from when I did the Sirdal and nothing has changed, so I'm confident in my gauge calculations.


In the meantime, I've been doing designs for the sweater and taking all sorts of inspiration from Latvian, Estonian, and Scandinavian designs. The center panel will have the lily flowers separated with lozenges that contain images from my life. The lower panel will contain more traditional figures. Between the panels I'm thinking of doing a latticework similar to this.
The sweater will have a front half opening with a lozenge being the placket for the zipper. When I have a spare moment between jobs (the day one and the knitting ones), I'll sit down and work out the main charts for the lovely thing. The motif bands will be white on black with the lattice white on black. Cuffs and bottom edge will be hemmed. And as I'm pear shaped, the sides will have a wedge motif to disguise the shaping.
And they say I'm crazy. Muwhahahahahaha!!


Swatch: headband done!

Here's the swatch of one of my patterns .... it's Dale of Norway's Heilo in a dark-olive green and cream. I'm also going to do the highlight contrast as a dark, charcoal grey ....

BTW, my 16yod loves this headband and has already "schneebed" it for her use.

Headband/Swatch Complete

Hi, All. I got some free time this last week, so I was able to get the swatch done. I'm pretty happy with the colors and yarn.

I'm getting 5.5 stitches to the inch with size US3 needles. I'm using Jaggerspun 8/3 wool yarn. It's going to be a long knit, that's for sure, since I'm kind of wide and tall. I'm going to knit the crew neck version but also making it a cardigan, so I'll be steeking the front, too. I've never steeked, so this is going to be a challenge. I love a good challenge. I'm looking forward to seeing what everyone else is doing.

Sunday, January 20, 2008

Time to move on to Headband...

Yarn and Color:
After making several swatches, I finally came to a decision what yarn and color to use for my sweater. I got an idea from most unlikely place, Glamour magazine (I don't even read the magazine! But somehow, I brought it back from a flight I took this summer to Canada). I believe the colors are not for a traditional Norwegian sweater. But I really like the looks on white base, light grey, purple and navy combination. I also like the bulky feeling and texture with this color. So I am going to use worsted weight. The orange swatch is done with sports weight yarn I had (Nature Spun sports weight, US3) Others are with worsted weight (2 of them Nature Spun, 1 of them Elann.com Highland wool, US6). Motifs are from 1000 Great Knitting Motifs by Luise Roberts.

Idea and Style:
I have spent quite some time looking at different sources for ideas for this sweather. Dale of Norway, any knitting magazines, yarn catalogues and anything on internet. It is overwhelming to see so many beautiful sweaters out there! Since I am going with non-traditional yarn, I thought I wanted to keep my style traditional. But I came across with this really cute sweater on Rebecca no. 34 August-October issue and fall in love with it (this one also has a nice color contrasting work. The motif on shoulder and lower body are done in opposite colors). So I am going to be a rebel and add a hood to the sweater. So at this point, only hope I have it to pick a traditional motif to make this a Norwegian sweater! Now I am working on a headband.
Posted by Picasa

Thursday, January 17, 2008

Fana Swatch

I've decided to make a Fana sweater. I'm using Rauma Strikkegarn and made this swatch with #3 needles.


The shoulder and cuff motif I'll save for the headband.

I really want to make a Fana cardigan that I've been drooling over instead of a pullover. I have relatives from the west coast of Norway, and visited Bergen last year, where Fana sweaters originated. And I want it to be a bit fancy with pewter buttons. So, I'll be knitting steeks up the front, cutting out a square neck, and notches in the cuffs. The edges are bound in trim (except the bottom).

There's a photo of it in "Everyday Knitting: Treasures From a Ragpile" page 39 #G and on page 47 of "Knitting in the Nordic Tradition" if you happen to have those books.

Do you like how I throw the word "steek" around? I have never done one before. I'm going to stitch and cut my swatch open tomorrow to do a row count for my headband.

I don't have everything figured out yet, button holes, for instance. Can I cut them in later or do I need to knit them in as I go? And how does the tape go on?

My biggest challenge will be tension. I've done some stranded work in baby yarn that I'm happy with, but still have trouble with thicker yarn.

Wednesday, January 16, 2008

Headband Gauge Swatch

Hi Everyone! I hope more of you will share some photos of your yarn and stitch swatches with us soon! I love seeing what everyone is doing.

It sounds like a lot of you are ready to start working on the headbands. This is a great way to do a gauge swatch that you can use afterwards, instead of just collecting swatches in a huge box like I do. I actually love swatching -- trying out new yarns, colors, and stitch patterns -- and so I do have a giant carboard carton full of swatches in the closet in my spare room.

I chose a headband for the practice project in the Norway chapter of Ethnic Knitting Discovery because a ski headband seemed to be such a great match for the ski sweaters. Even if you don't ski, you can probably find a few cold days in the winter to sport a wool headband.

If you look on page 109-111 in your book, you'll get an overview of how I approached each project in the book. So by making the headband, in addition to getting a swatch you can actually use, you'll also get familiar with the way I've structured the steps for designing and knitting your sweater.

Get Ready (page 109)
In this section, I discuss the yarn and knitting needles needed for the project. We've already talked about yarn here and here, so I'll bypass that right now.

All I want to say about needles, is don't ever take suggested needle sizes as a rule. You have to learn your own knitting tension and do the swatch to be sure you have the right size. It's less important for a headband than for a sweater -- because it's a smaller project and because there are fewer stitches so a slight variation in gauge will make less difference in the finished circumference than it would on a larger piece with more stitches. After knitting a lot for several years, I've discovered that I almost always have to go down two needle sizes for flat knitting because I work very loosely, but for circular knitting, I almost always get the gauge on the yarn ball band with the suggested needle sizes. The more you knit, the more you get to know your own style and quirks.

Get Set (page 110)
In this section I talk about the gauge and size of the project. Before making a gauge swatch, you have to select the stitch you're going to use. You may notice that you get a different gauge for colorwork than you do for plain knitting. A lot of knitters will go up a needle size or two on the colorwork portion of a project that also has plain areas to get the same gauge in both portions. The book says to make a gauge swatch before starting the headband, but if you're familiar with your knitting tension and you don't mind knitting out a headband if it's really off in size, you can skip that step. After all, we're making the headband AS a gauge swatch for a sweater!

I've got some suggested sizes for headbands in this section. For the sweaters I don't give any pre-sized options because we'll all be creating a custom-fitted garment. But since heads are more standard than torsos, I threw in some guidelines here.

Now you're ready to start filling in the numbers on the schematic and spreadsheet.

Knit (pages 110-111)
Here's where I present the three different ways to plan and knit your garment. Feel free to photocopy these pages so you can write in your own numbers and still keep the book clean for future projects.

Option 1: The Visual Plan
My favorite way is to just figure out how many stitches I need to start, cast on, and wing it. For those who like to make things up as they go, I've provided a little schematic where you can mark down a few important numbers and get those stitches on the needles!

Option 2: Using a Planning Worksheet
This section walks you through all the calculations you'll need to make your garment. There are measurements and stitch counts. It's a small table for a headband, and two larger ones for the sweaters. There are blanks for you to fill in your own numbers, as well as sample calculations that I've done and a description of what you're figuring out on each line. For a headband, you need only three numbers and one calculation:

1. Stiches per inch.
2. The circumference (a measurement)
3. The number of stitches (gauge per inch times the circumference, rounded off to an even multiple of your pattern).

If your pattern doesn't fit nicely, see page 32-34 for tips on centering patterns, or chart out your entire headband on graph paper or with software.

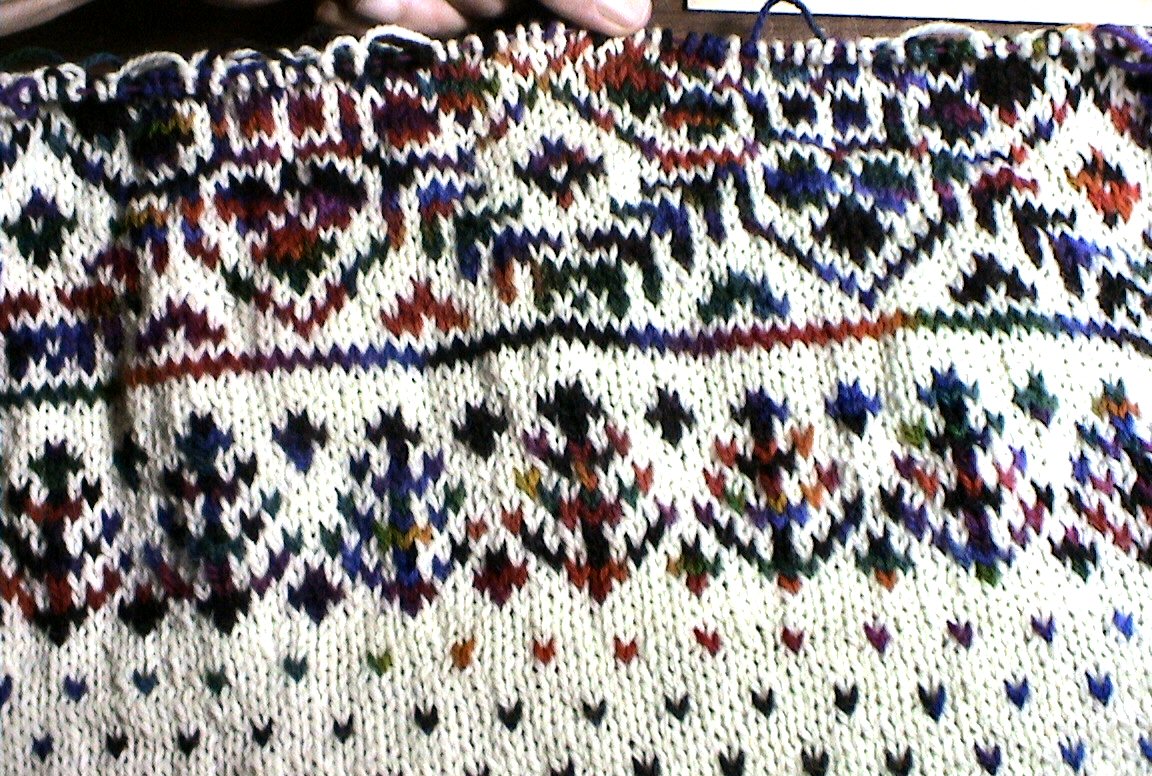
I didn't add any edging to this headband because I designed them to fit snugly and stretch to fit on the head, so the stretching will eliminate the tendency for the edge roll. I bought this headband when I was in Alaska in 2004 and it's lined with polar fleece fabric for extra warmth and windproofing. It's just plain Stockinette stitch, which makes it work nicely for a gauge swatch.

doghair headband

Option 3: A Step-by-Step Project Sheet
This is for those who like more details before moving forward, or for those who are frequently interrupted or need to take long breaks from projects. You'll notice that there are gray numbers in circles in this section, these match up to the numbers on the Visual Plan. You'll aso see green letters in fun shapes in the margins, these match up to the numbers you've calculated in the spreadsheet. Match everything up, fill in your numbers, and you basically have a finished pattern to knit from.

So there you have it, you can proceed in any fashion that matches your personality. If you have any questions, feel free to post them here in the comments.


OK, now some of you may have patterns that end up being too wide for a headband. In a few days I'll post instructions on how to continue knitting and work a crown so you can have a hat!
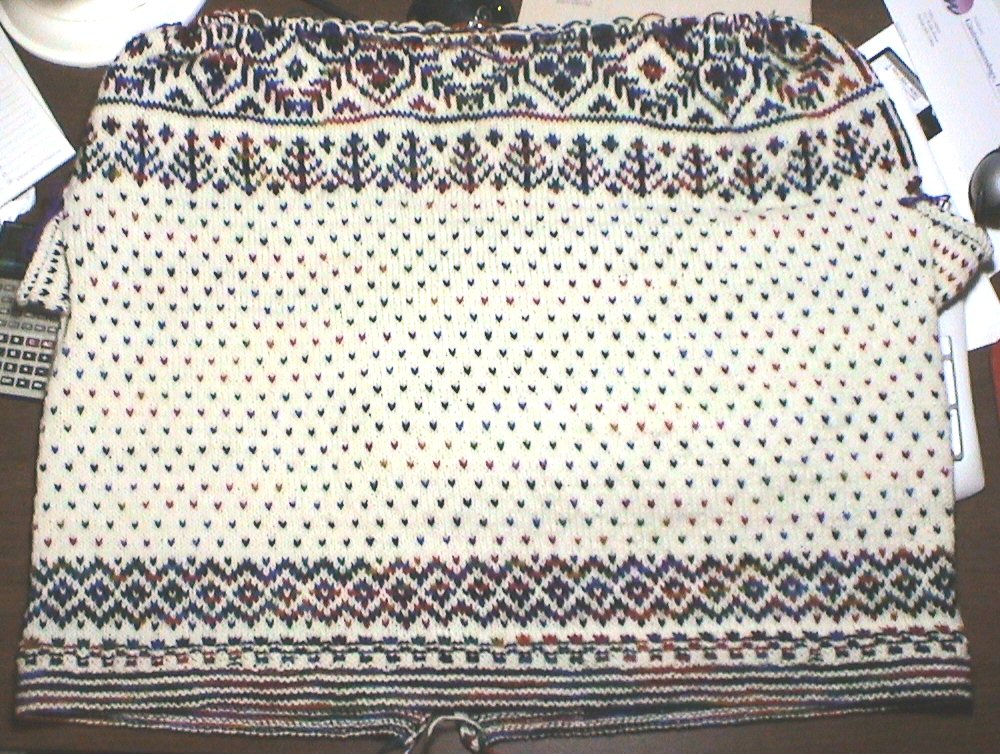
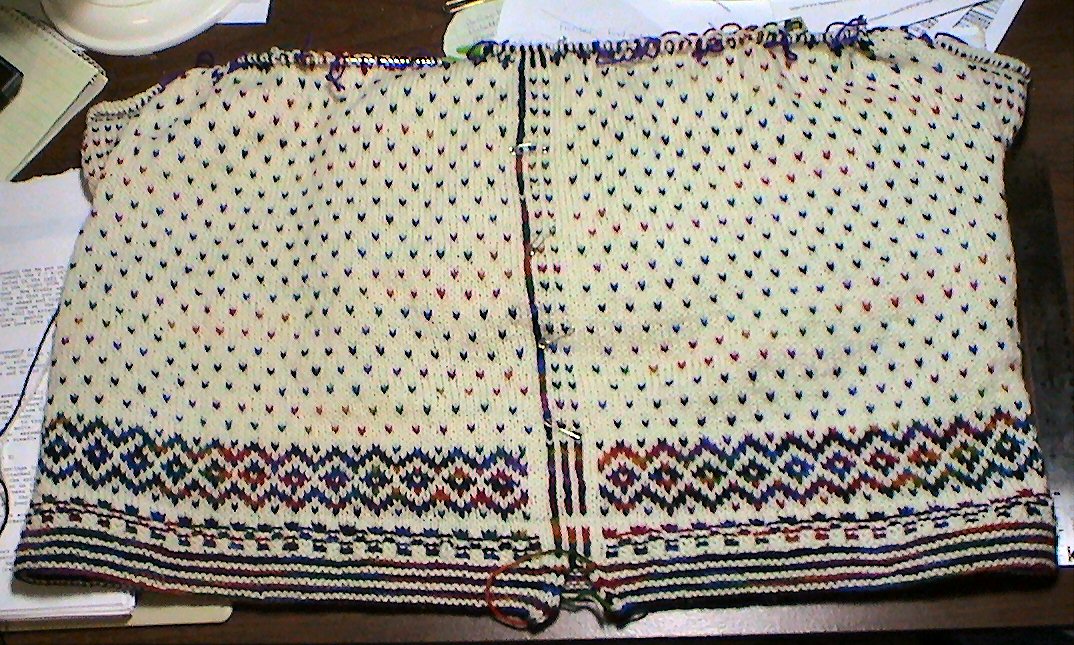
Tuesday, January 8, 2008

Swatching Progress


I have been swatching and digging around in my vast knitting library. I am using Jo Sharp DK. I found a small "border" chart in an old Dale book that I like so I started on it. I like my colors.
The dark color is "Beetle" which is very brown/green. The light color is Avocado and the splash of bright is Ruby. I was thinking about lice but decided I want the solid brown for the body. I am still exploring motifs for the yoke part. I am pleased to have found this yarn in my stash!

Sunday, January 6, 2008

Preparations


I've done a Norwegian sweater before but it was from a Dale of Norway pattern. It's done in Dale Heilo and wears very well. I was not so keen in doing the Norwegian sweater but now that I'm getting into it I'm getting more excited about knitting this up.


I already had my yarn set aside for such a project. I had scored a deal on Heilo yarn in the colors I've wanted to use in Woodland Woolworks' back stash room so that part was all set. I'm opting to go traditional with the black and white with touches of red for my colors. Lately I've been treasure hunting for designs to use on the sweater. Lizbeth Upitis' Latvian Mittens and Terri Shea's Selbuvotter have been great sources of inspiration. The Dale of Norway sweater for the Lillehammer Olympics gave me an idea of using lozenge panels on the chest panel to frame images that define who I am. There wouldn't be a string of panels like that sweater but panels between lily motifs. It will help make the placement easier.


One thing I learned while doing Dale patterns is that their charts run from one edge of the motif to the middle with the center column worked once. In other words, the knitter starts at the right edge, works right to left to the center column, then works left to right. I liked this and have incorporated this method in how I'm setting up my charts and creating my motifs. I have a feeling that when I do my headband to test the top band of colorwork that it will be so wide it will end up a hat instead. We'll see.

Saturday, January 5, 2008

Swatching Trees


This is my original washed swatch to test that my yarns will be compatible. Of course, since then I've changed colors but the yarns are the same.


This is the detail of what I am going to use on the sleeve and perhaps the shoulder.


Here we have the central tree motif that is so large, I've decided to move it to the bottom of the sweater. The way the brown cuts into the zig zag on the top is the way it will be on the bottom. Only thing is, this lovely dark green I'm using I may not have enough of and it's been discontinued. A lighter green may have to do.

Norwegian Sweater Knitalong


Hi Everyone, welcome to the Ethnic Knitting Discovery knitalong. We'll be making a Norwegian pullover that we'll design ourselves using the instructions in Ethnic Knitting Discovery. I'll be posting lessons here to keep us all moving forward together, and we'll be posting photos of our progress as we go along. We also have a Yahoo! Group for more in-depth discussions about the techniques used in this sweater and for general discussions about ethnic knitting techniuqes from around the world. Feel free to sign up in both places. I may also set up a Ravelry group.

Here's the basic schedule. This is probably when I'll post lessons about each of the steps in designing and knitting the sweater. Feel free to move ahead more quickly on your own and don't feel bad if it takes you more time. We all understand that life sometimes takes prioirty over knitting.

Now - Choose yarns and colors, collect tools, get a copy of the book

Jan 15 - Knit headband swatch to test out stitches and colors, plan layout of pattern stitches for sweater

Jan 30 - Do the arithmetic needed to cast on for the body

Feb - Knit body

Feb 28 - Do the arithmetic needed to begin the sleeves

Mar - Knit sleeves

Mar 30 - Cut open armholes (and neck or crew neck version) and begin finishing

Whenever - Finish!


Below you'll find the information we've already discussed on the Yahoo! Group.

Illustrations by Joyce M. Turley, www.dixoncovedesign.com